Our Location
1250 Beacon Street
Brookline, MA 02446
Troubleshoot your wine cooler door not sealing with our guide on gasket testing and replacement to maintain the perfect climate for your wines.
A wine cooler door that doesn’t seal right can use up to 25% more energy. It also shortens the life of the compressor. This can spoil a bottle you wanted to keep for a long time.
Is your wine fridge door not shutting tight? This can cause uneven cooling and temperature changes that damage aging wine. You might see frost or condensation. Your electric bills could go up too. A door that doesn’t seal right makes the compressor work harder and wear out faster.
Here’s a quick guide on why a good seal matters. We’ll show you how to tell if the seal is bad and how to fix it. Learn simple ways to test the gasket, including visual checks and the dollar-bill test. We will also tell you what tools and materials you need to replace it. Plus, you’ll find step-by-step instructions for putting in a new gasket.
Many repairs can be done by yourself, but some problems need experts. Things like structural damage, doors that keep being out of line, or repairs that are covered by warranty. Before you start, make sure to unplug the cooler. Work in a well-lit area and have basic tools ready for safety and to make the job easier.
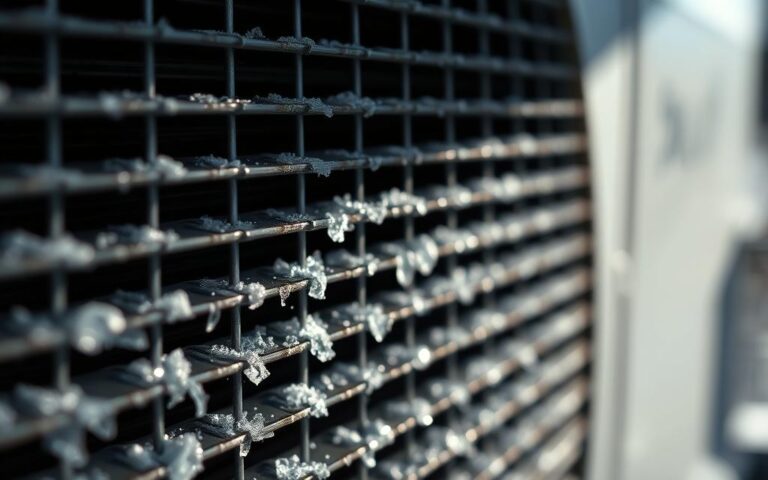
The door gasket is a simple part with a big role. It’s a flexible seal that fits around the door’s edge. When the door closes, it presses against the frame to keep air in. KitchenAid, Whirlpool, LG, Samsung, and GE make gaskets specifically for their models. There are also general options made from materials like PVC or EPDM rubber.
A door gasket is the soft strip that you feel around a wine fridge door. It can be made with magnets to stick better to glass doors. Others just squeeze tight without magnets.
This gasket fits into a groove that runs around the door. It blocks gaps, stops dust, and keeps the inside cold. If a door doesn’t close right, the gasket might be the problem.
A snug seal keeps warm air out and cool air in. This helps keep the humidity level and temperature steady.
When a gasket is damaged, warm air may enter. The fridge works harder, uses more energy, and wears out quicker. This could cause condensation, frost, or uneven cooling, which isn’t good for your wine.
| Gasket Feature | Effect on Performance | What to Watch For |
|---|---|---|
| Material (EPDM vs PVC) | EPDM resists heat and ozone better; PVC is cost-effective | Cracking, hardening, loss of flexibility |
| Magnetic Seal | Improves door contact and consistent closure | Weak magnetism or misalignment prevents proper seal |
| OEM Fit (brand-specific) | Exact fit reduces gaps and air leakage | Gasket not matching model causes pressure points or gaps |
| Compression & Flexibility | Allows thermostat and compressor to stabilize temperature | Permanent deformation leads to temperature fluctuations |
| Age and Wear | Worn gasket increases energy use and shortens appliance life | Visible tears, gaps, or persistent condensation |
A failing door seal can harm wines and increase energy costs. Look out for clear signs that indicate the need for troubleshooting and quick repairs. This list will help you recognize common symptoms early. Then, you can address a wine cooler door not sealing before any damage occurs.
Temperature Fluctuations
Unstable temperatures are a primary sign of air leaks. You might notice the thermostat overshooting, the compressor turning on and off too often, or uneven temperatures inside. Keep an eye on the interior thermometer for consistent changes while checking the wine cooler door.
Condensation Inside the Cooler
If you see water droplets inside or frost near the door, it means warm air is getting in. This usually happens when the door doesn’t seal properly. Check the seal and surrounding areas for any gaps or debris that might be causing the issue.
Unusual Sounds
Rattling noises, a louder compressor, or popping sounds can indicate the system is overworking. This could be due to a bad seal or door misalignment, making the compressor work harder. Listen for new sounds and check for drafts around the door to diagnose the problem.
Here are some checks you can do right away:
Start inspecting early. Look at the gasket and hinges at the first sign of trouble to prevent energy waste or wine spoilage. It’s smart to include these inspections during routine maintenance to keep your wine cooler working well.
When a wine cooler door won’t seal or stay closed, small issues can cause big problems. This part shares common causes and signs so you know whether to clean, adjust, or repair components.
Old gaskets can lose their flexibility. Look for signs like cracking, hardening, tears, or when the gasket doesn’t spring back. Manuals often advise replacing gaskets that are bent, cracked, or not soft anymore.
Loose hinges or a sagging door make the contact uneven. Setting the cooler on an unlevel floor also prevents the door from staying closed. Tightening screws or adjusting the cooler’s feet might fix the issue for many models.
Groove blockages can stop the gasket from sealing properly. Things like crumbs, sticky stuff, or small ice can cause gaps. Cleaning the groove often solves the problem without needing a new gasket.
Sometimes, gaskets fall out of their groove. You might need special glue or adhesive for your brand to reattach it. Follow your model’s guide because each brand fixes gaskets differently, using screws, clips, or adhesive.
Shipping might deform new gaskets. Technicians suggest a warm bath or gentle shaping before fitting it, helping the seal match the frame better. This could prevent gaps that could make the repair fail at first.
Here’s a quick guide to see causes, signs, and first steps for fixing issues.
| Cause | Common Signs | First Action |
|---|---|---|
| Worn-out gasket (cracks, hardening, tears) | Visible cracks, gaps, gasket not springing back | Inspect closely; replace gasket if brittle or torn |
| Misaligned door (loose hinges, sagging) | Uneven gap around door, door drifts open | Tighten hinge screws; adjust leveling feet per model guide |
| Foreign objects in seal (crumbs, ice, residue) | Partial seal, sticky spots, trapped debris | Clean gasket groove with mild detergent and soft cloth |
| Gasket detached from groove | Section of gasket loose or folded out of frame | Reattach with manufacturer-approved adhesive or clips |
| New gasket deformed from packaging | New seal sits unevenly or leaves gaps | Warm-soak or condition gasket before installing |
Before testing, make sure to unplug the unit and open the door. A simple look can tell you a lot about why a wine chiller door won’t close or a wine cabinet door isn’t sealing right. Check for any cracks, tears, stiff spots, dirt, or areas where it’s come loose from its groove. Also, look for signs where the gasket doesn’t touch the frame anymore.
Cleaning the gasket might make a big difference in your test results. Use gentle soap and water to remove dust and debris, then dry it off. After that, plug the cooler back in and wait for it to get to its normal temperature before you test again. It’s important to check the seal at the top, middle, and bottom, as some only fail in specific spots.
To test the seal’s strength, try the dollar bill method. Shut the door with a dollar bill or a sheet of paper in it, then pull. If it comes out too easily in various places, the seal isn’t strong. Do this around the door to find all the weak spots.
To spot small leaks, move your hand slowly around the edge of the closed door to feel for air. You can also use a flashlight in a dim room – have someone look from the outside for any light coming through. A thin strip of ribbon or a smoke stick can also help you find leaks, but be careful and make sure the area is well-ventilated.
Don’t forget to test the cooler once it’s cold. Sometimes, a gasket might only fail to seal when it’s cold, explaining why doors might not shut properly after cooling. If it’s a minor issue, applying a little petroleum jelly on the gasket’s base can offer a temporary fix until you get a replacement.
Keep track of your findings with the checklist below to decide what to do next.
| Test | What to Look For | Action If Fails |
|---|---|---|
| Visual Inspection | Cracks, tears, hard spots, detached areas, dirt | Clean gasket; note damaged sections for replacement |
| Dollar Bill Test | Bill slides out easily at multiple points | Mark weak spots; test again after cleaning or warming |
| Hand/Flashlight Check | Drafts felt or light visible around frame | Confirm with ribbon or smoke; consider reseating or replacing gasket |
| Cold-Temperature Check | Seal fails only when unit is cold | Try petroleum jelly to reseat temporarily; order new gasket |
Before starting to fix the wine cooler door, get all parts and tools ready. Make sure you know your cooler’s brand and model like Samsung or Whirlpool. Then, order a matching gasket from an OEM or a good aftermarket brand. A perfect match stops the door from staying open after you’re done.
Find the model number on your cooler and look at the user manual. Purchase a gasket for that specific model or a fitting aftermarket one from a reliable source. If the new gasket is folded, soak it in warm water for ten minutes to soften it before installation.
You’ll need simple tools: Phillips and flat screwdrivers, an adjustable wrench or Allen key for the hinges, and a level. These are for making sure the cooler is properly balanced. Sometimes, you may have to cut for fit, so a utility knife or sharp scissors are necessary.
Some repairs might require Torx drivers or small sockets. Hence, keep a socket set and Torx drivers nearby for complicated models. Having these tools around means less stopping and quicker cooler door fixing.
Grab mild detergent, warm water, and soft cloths for cleaning the gasket area. A toothbrush can scrub hard-to-reach spots. When needed, use silicone lubricant on hinges but steer clear of petroleum-based products unless advised.
If your cooler model needs glue, bring gasket cement and new screws or clips for any rusty parts. Use petroleum jelly cautiously for a temporary fix. Before you start, unplug the cooler and take out any bottles. This reduces door pressure. Also, ensure you have good lighting and the manual close by to avoid errors during the repair.
Replacing a worn gasket can fix a wine fridge that won’t close. It can also solve cooling problems. Just follow these steps to remove the old gasket, install a new one, and test the fix. Move slowly and stay organized. This ensures the new seal sits properly, fixing the door seal issue for good.

Removing the old gasket
Start by turning off the fridge and moving shelves out of the way. Fully open the door and look at how the gasket is attached. Some use a push-in method, while others might be screwed in or glued.
For push-in types, gently pull the gasket out from a corner. If it’s glued, use a plastic scraper to lift it. Then, clean off any leftover glue with warm soapy water or a mild cleaner that won’t harm the fridge. Keep the old gasket to compare sizes and remember how it was fitted.
Installing the new gasket
Some gaskets need to be softened in warm water for about ten minutes before installation. Begin at a corner and press the gasket evenly into place. For screw-in models, attach the gasket loosely at first then tighten it bit by bit to avoid unevenness. Only use gasket adhesive if the manual says to, and let it dry as recommended. Make sure magnetic seals line up with the metal frame of the fridge. Trim any extra parts only if the instructions say it’s okay. Correct installation prevents the door from not closing or leaking air.
Testing the new seal
After putting the shelves back, turn your fridge on and wait for it to cool down. To test the seal, close the door on a dollar bill. You should feel some resistance when pulling it out. Feel around the door for drafts or shine a light to spot any gaps. Keep an eye on the temperature and moisture inside for one to three days. Also, make sure the cooling is even. If you notice issues, double-check the alignment of the door, how tight the hinges are, and if the fridge is level.
Regular upkeep keeps your wine cooler working well. It helps avoid issues like door problems or a door not sealing right. Do a few checks every couple of months. This saves time and protects your wine.
Every 3 to 6 months, check the gasket for any damage. Look after moving the cooler or after a lot of use. Catching problems early can help avoid door sealing issues.
Find any parts that have come loose. If you do, push them back in place gently. Or, use the maker’s advice for fixing it with glue.
Use warm water and mild soap to clean the gasket. A soft cloth or toothbrush works best. This gets rid of dirt that might stop the seal.
After cleaning, rinse it well and dry it off. Clean more often in damp places. Stay away from harsh cleaners that can damage the rubber.
Use a spirit level to keep the cooler straight, adjusting the feet if needed. A well-leveled unit means less strain on the door. That helps keep the door sealing well.
Check and tighten the hinge screws now and then. If the manual says it’s okay, use a silicone-based grease on the hinges. Avoid greases that can harm rubber if your cooler has rubber gaskets.
Be gentle with the door and don’t overfill the shelves. Too much weight or being rough can lead to alignment issues. That may stop the door from shutting properly.
| Task | How Often | Why It Matters |
|---|---|---|
| Visual gasket inspection | Every 3–6 months | Find cracks or compression before the seal fails |
| Cleaning gasket | Monthly; weekly in humid environments | Removes residue that prevents full contact |
| Leveling and hinge check | Every 6 months or after relocation | Prevents misalignment that causes leaks and improper closing |
| Condenser coil dusting | Every 6 months | Keeps compressor efficient so seal isn’t overworked |
| Avoid heat exposure | Ongoing | Reduces wear on gasket and lowers cooling load |
When simple fixes don’t fix drafts or temperature changes, a professional can save you time and avoid damage. Issues like hinge problems, bent frames, or electronic issues usually need someone trained. It’s important to know when to call a pro to protect your collection and any warranty.
Watch if your wine fridge door won’t stay shut after you tighten the hinges or level the unit. This could mean it’s more serious than just a loose screw.
Look for warping, cracks, or structural harm in the cabinet. The seal might not fit right if these issues are present. Problems like these often demand more than just changing the gasket.
Electrical issues are signs too, like odd sounds from the compressor, or it not reaching the right temperature, or the control board resetting often. If cooling fails and the door won’t close, it’s time for a technician to check the compressor and controls.
If your cooler is still under warranty, call the official service before trying big repairs yourself. Using certified techs keeps your warranty valid.
Look for repair shops skilled in refrigeration and wine coolers. Most national and local services will say which brands like Samsung, LG, or KitchenAid they work on. Check if they’re used to fixing wine coolers.
Ask for their credentials, look at customer reviews, and make sure they know how to fix seals and adjust hinges. A good technician will explain how they plan to check everything.
They should give you a detailed estimate, noting if parts are OEM or not. Inquire about warranties for parts and labor and how long getting parts and fixing it will take. Knowing what to expect avoids surprises later.
For big jobs like fixing compressors, control board issues, or frame repairs, hiring a pro is quicker and safer than trying it yourself. They have the right tools and know-how to make sure the fix lasts.
Choosing the right wine cooler involves three main things: protection, ease of use, and how much it costs over time. Think about how many bottles you want to store and where you’ll place the cooler. Also, consider the type of door, the quality of the hinges, and how well it controls temperature to prevent problems like the door not closing right or failing to seal properly.
Key Features to Consider
You can pick from solid doors or ones made of double-pane tempered glass that blocks UV rays. Glass doors need strong seals to keep out light and heat. Make sure the cooler has sturdy hinges and a solid frame to keep the door from sagging and staying shut tight.
Look for models with precise temperature control and easy-to-read digital thermostats. If you like both red and white wines, get a cooler with dual zones. If you have older wines, find a cooler that doesn’t vibrate much to keep the sediment undisturbed.
Energy Efficiency Ratings
Try to find wine coolers with an Energy Star certification. An energy-efficient model uses a top-notch compressor and insulation to minimize running time. A tight seal is crucial because poor sealing can increase energy use – good insulation helps even if the seal wears out.
Examine the cooler’s energy consumption and insulation quality. A cooler with good insulation can handle small seal issues without working too hard, which keeps temperatures stable.
Size and Capacity
Choose a cooler that fits the number of bottles you have. Too few bottles make the cooler work harder, while too many can block air and damage the seals. Decide if you want a built-in model or a freestanding one. Built-ins might need special hinges and seals to look seamless.
Think about how easy it will be to fix the cooler in the future. Go with brands like Whirlpool, GE, LG, Samsung, and KitchenAid for easier access to parts or repairs. Check out reviews about how long the seals last, especially if there are complaints about the door not sealing after some time.
| Feature | What to Look For | Why It Matters |
|---|---|---|
| Door Type | Double-pane tempered glass with UV filter or solid door | Blocks light and heat; glass needs a durable gasket to prevent the wine cooler door not sealing |
| Hinges & Frame | Heavy-duty, adjustable hinges and reinforced frame | Prevents sagging and misalignment that cause a wine fridge door not closing |
| Temperature Control | Digital thermostat, dual zones | Keeps consistent temps; compensates for minor gasket inefficiencies |
| Vibration | Low-vibration compressor or thermoelectric system | Protects wine sediment and reduces mechanical wear on seals |
| Energy Rating | Energy Star or low wattage consumption | Lower operating cost; an energy efficient wine cooler handles minor air leaks better |
| Size & Installation | Correct bottle capacity; built-in vs. freestanding | Ensures airflow and proper door alignment for long-term seal health |
| Brand & Service | Well-known manufacturers with available parts | Easier gasket replacement and better long-term reliability |
Here are short, easy-to-understand answers to readers’ top questions. We’ll talk about how long they last, their use, and fixing them. Problems like a bad gasket or door issues are common.
Wine coolers typically last between 8 to 15 years. How long yours will last depends on its build quality, brand, and how well you maintain it.
If you ignore the gasket, the cooler’s life could be shorter. A door that doesn’t close right makes the compressor work harder. This can cause it to fail sooner.
Type of compressor, ventilation, and placement affect longevity. Keeping coils clean and checking the gasket can help parts last longer.
Yes, you can. Beers, sodas, and drinks without fizz are okay. Just adjust the temperature based on what you’re storing.
However, opening the cooler often or a door that doesn’t close right can mess up the temperature inside. Also, different drinks can affect the wine’s quality if temperatures fluctuate.
Stuffing it with too many cans or bottles can make it run more than needed. If the door isn’t sealing or closing right, check the gasket. A quick clean or a new gasket can fix the issue.
Is fixing a leaky gasket costly? Mostly, it’s not. You can buy a new gasket and use simple tools. But, if the leak damaged the cabinet or compressor, costs could be higher.
When should I replace a gasket or buy a new cooler? Change the gasket if the cabinet and compressor are fine. If the frame is bent or the cooler keeps breaking, consider getting a new one.
A tight door gasket is crucial for keeping your wine’s quality high and your cooler efficient. It ensures the temperature and humidity are just right, uses less energy, and helps wine age perfectly. If you notice the door seal isn’t tight, fix it quickly to keep flavors intact and save money.
Check gaskets every few months and clean them with soap and water. Use a dollar bill to test if the seal is tight. For basic fixes, make sure your cooler is level, the hinges are tight, and there’s nothing stuck in the door. If the gasket is damaged, replace it with the correct part to avoid future issues.
If you’re handy, you might be able to replace the gasket yourself. However, for big problems like structural or electrical issues, call a professional, especially if there’s a warranty. Don’t forget to clean the coils, avoid stuffing the cooler too full, protect the door from harsh slams, and pick a durable, efficient cooler for the best value.