Our Location
1250 Beacon Street
Brookline, MA 02446
Confronting a washing machine seal leak? Learn when it's time for a check-up and how to tackle seal replacement for a watertight fix.
A small leak in your washing machine can waste over 10,000 gallons of water in five years. That drip under your appliance is more than annoying. It hints at a big problem that can affect your washer’s safety, cost, and lifespan.
The mechanical seal stops water from leaking where the tub shaft meets the outer tub. It’s usually found in front-load washers. If it breaks, you might see water leaking during or after a wash cycle, or find puddles under the machine.
Leaks can happen at different spots like the rubber door seal, drain pump, or hose connections. But when the mechanical seal leaks, it creates constant dripping. This can cause water to spread under the machine or onto the floor.
Ignoring a seal leak can lead to major issues. It can warp floors, grow mold, create electrical risks, and damage the washer’s internals. Plus, it wastes water and energy.
This guide is for those who own or rent homes in the US. It explains how to find a leak in your washing machine, replace the seal yourself, and when to call a pro. It also includes prevention tips and the costs you might face.
Seal issues may start small but can lead to a steady drip, damaging floors. Leaks are usually due to worn rubber or a misaligned shaft. Spotting these signs early can save on repairs and stop mold.
Wear and tear top the list of causes. Seals and rubber parts get old, lose their flexibility, and crack. This happens due to constant bending and the buildup of soap. Also, harsh cleaning agents like bleach harm the rubber, speeding up its breakdown.
Items like coins or zippers can also damage the seal. Overloaded machines or failed bearings shake the drum. This movement stresses the seal, causing leaks.
Errors during installation or manufacturing defects can misalign parts, increasing wear. The wrong soap or too much of it creates excess suds. This puts pressure on the seals and can cause leaks, especially during spin cycles.
Water under the washer or wet spots by the door are signs to look for. Soap scum, black marks, or mold on the gasket usually mean a leak.
A mildew smell by the door hints at trapped moisture and seal issues. Water stains or rust suggest a long-term leak. Leaks that get worse during spins point to a seal pushed too far.
Noises like squealing indicate wear on bearings. This often goes hand in hand with seal failures and results in leaks.
Washing machines use different seals to keep water in. Knowing which seal your washer uses is key to fixing it. This guide will tell you about the common types of seals and what to check.
Front-load washers need a strong rubber door seal and a shaft seal behind the drum. The way they’re built and their fast spin speeds put extra pressure on these seals.
Top-load washers have a vertical tub which makes their seals simpler. They mainly have a lid seal and a seal that connects the tub to the drum. These parts wear out differently, so top-load seals usually last longer.
Different brands like LG, Samsung, and others use unique materials and methods for assembling their machines. This means fixing them can vary a lot.
The rubber door gasket keeps the water inside the washer. It adjusts when the drum moves to avoid leaks.
Common issues with this gasket are mold, tears, and damage from chemicals and age. If you see a stain, water near the door, or a leak, these are signs.
Gasket problems are often easier to fix than shaft seal issues. Check the gasket for damage and make sure the clamp is tight. Clean mold off with bleach carefully, following the maker’s instructions.
Knowing if your washer has a gasket or a shaft seal helps you figure out the problem. Then, you can clean or replace the gasket, or get the shaft seal fixed.
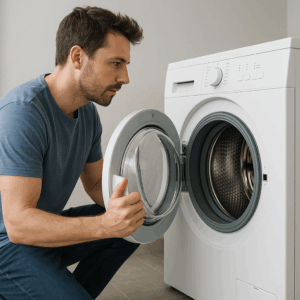
Start with safety: unplug the washer and shut off the water supply before you touch anything. Checking everything carefully saves time when finding seal leak issues in washing machines.
Begin by looking around. Check the door gasket, detergent drawer, hoses, pump, and under the machine for leaks. Then, run a quick cycle to see leaks happen. Use paper towels to find moisture by pressing them against seals and joints.
If you’re up for it, remove the kickplate or panel. Look for wetness, rust, or residue on the mechanical seal, tub, bearings, and shaft. Seeing corrosion or oil around the seal usually means the shaft seal is bad.
Pay attention to hose clamps and the drain pump. Cracks, loose clamps, or old connections can look like a seal problem. To test the detergent drawer, run a cycle with the usual amount of detergent and look for leaks.
Write down when and where each leak happens. Using photos or videos during the cycle helps identify seal issues when you’re ordering parts or talking to a repair person.
Hose issues can seem like seal leaks. Check the hoses for any damage or loose connections. Replace any hose that is worn or bulging.
Issues with the door latch can cause leaks around the door. If the door doesn’t close right, the problem might be the latch or strike, not the gasket. These might need adjustments or replacement.
Clogs in the drain pump or filter can lead to leaks. If the machine is louder than normal or has a wobble during spin cycles, check for metal bits in the tub. These signs often mean the bearings have failed, which usually damages the seal and requires more work.
| Symptom | Likely Cause | Quick Check |
|---|---|---|
| Water under front of washer during spin | Worn mechanical shaft seal or door gasket | Inspect seal area, run spin cycle, look for oil or wetness |
| Drips near hoses | Cracked or loose supply/drain hose | Examine hose for cracks and tighten clamps |
| Water from detergent drawer | Detergent overflow or clog | Run cycle with normal detergent and watch drawer |
| Noise and wobble during spin | Bearing failure leading to seal damage | Listen during spin and check for metal debris |
| Intermittent leaking | Loose clamps, worn grommets, or door latch issue | Trace leak timing, inspect clamps and latch |
If it looks like the seal has failed, make sure to note your washer’s model and serial number. This info is key when getting parts for a repair or when asking for expert advice on fixing a seal leak.
Knowing when to change a mechanical seal helps prevent more damage to your washer. Look for consistent or repeated leaks after you’ve already checked hoses and pumps. Notice leaks coming from the underside center of the drum or near the motor shaft.
Leaks that keep happening under the machine even after you tried to fix them suggest a seal failure. If you see wetness on the outer tub or water by the motor shaft, take that as a warning. When cleaning or adjusting the door gasket doesn’t help, the problem might be the internal shaft seal.
Seeing more than one issue can mean damage to both seal and bearings. Hearing loud grinding noises, seeing a drum that wobbles, or finding metal shavings are urgent signs. A leak following a heavy load or impact might mean the seal shifted out of place.
Look closely for signs like cracking, hardening, or gaps in the seal flange. These signs mean the mechanical seal needs a replacement and it’s time for a new washing machine seal, not just a quick fix.
Door seals made of rubber typically last between 5–10 years, but it varies by how you use your washer, the detergent, and care. Rotary shaft seals might last 5–15 years, but they can fail sooner if the bearings wear down. The brand and how well you’ve maintained it also play a role.
Things like bleach, hard water, high heat, or strong detergents can shorten a seal’s life. Machines used often or for heavy loads may need new seals sooner than those used less.
When choosing to make a repair, consider if leaks are constant, if you’re seeing signs of seal and bearing damage, or if the washer is old. For those thinking about repairing a leaky washing machine seal, balance the repair cost with the potential need to replace the appliance if it’s old or failing.
| Indicator | What It Means | Action |
|---|---|---|
| Recurring bottom-center leak | Internal seal or shaft issue | Inspect seal; plan washing machine seal replacement |
| Loud grinding or drum wobble | Bearing wear has likely compromised the mechanical seal | Stop using machine; replace seal and bearings |
| Visible cracks or hardened seal | Material failure from age or chemicals | Order replacement seal; perform repair |
| Leak after impact or overload | Mechanical displacement of seal | Assess damage; proceed with fixing a leaky washing machine seal |
| Minor dampness that clears after gasket cleaning | Surface gasket issue, not shaft seal | Clean or reposition gasket; monitor for recurrence |
Fixing a mechanical seal can stop leaks and help your washer last longer. Start by reading the steps carefully. Gather all the tools and parts you need, and don’t forget to follow safety guidelines. This guide will show you the tools needed. It gives clear instructions for replacing seals in popular front-load washers from brands like LG, Samsung, Whirlpool, Maytag, and GE.
Tools you’ll need
Step-by-step replacement process
Warnings and tips
| Task | Typical Time | Skill Level | Key Notes |
|---|---|---|---|
| Prep and safety shutoff | 10–20 minutes | Beginner | Unplug, close water, drain tub |
| Access panels and remove drum | 30–90 minutes | Intermediate | Model-dependent; follow service manual |
| Inspect and replace bearings | 30–120 minutes | Advanced | Replace bearings if worn to avoid repeat failure |
| Remove old seal and clean shaft | 15–45 minutes | Intermediate | Use isopropyl alcohol to remove residue |
| Install new seal and reassemble | 45–150 minutes | Intermediate to Advanced | Press seal evenly; orient spring correctly for effective fixing washing machine seal |
| Test cycle and final checks | 20–40 minutes | Beginner | Look for leaks during fill, wash, spin phases |
Simple repairs might fix small leaks. But big problems need a closer look. Persistent wet floors, loud noises, or a shaky drum are bad signs. Seeing metal bits or hearing constant scraping means it’s time to call a pro.
Owners often wait too long to call for help. If you can’t find the problem, don’t have the manual, or it’s under warranty, seek an expert. Trying to fix it yourself might ruin the warranty or damage it more.
Situations Where Expert Help Is Required
Finding a Reliable Appliance Technician
Deciding between fixing or buying new? Ask a technician what’s best. Repairs on old machines can be costly. But a pro can make a new machine work like new again.
Before hiring, know what to expect. A good technician offers a clear price, guarantees, and knows your machine well.
Keep your washing machine from leaking by caring for it regularly. Doing a little each month reduces the need for big repairs. It also helps keep the seal in good shape for years.
Clean the door seal every month. Use a mix of vinegar and water or a special cleaner. This gets rid of mold, lint, and leftover detergent. Let the door stay open a bit after washing. This helps the seal dry out and stops mildew from growing.
Choose the right soap and use it wisely. High-efficiency washers need low-sud detergent. Using too much soap causes too many bubbles. These put pressure on the seals and parts inside. Once a month, run a hot cleaning cycle. You can use a tub cleaner or vinegar. This gets rid of residue that can damage the seal.
Every few months, check the hoses and clamps. Look out for any cracks or loose parts. Replace the hoses about every five years or if you see signs of wear. Old hoses can cause leaks around the seals.
Make sure your machine is balanced correctly. A washer that’s not level shakes more. This extra movement can wear out the seal and parts quicker.
Be careful with bleach. Never pour it straight on the seal. Follow the maker’s guide or use recommended cleaners. This protects the seal material.
Don’t overload the washer. Putting too much laundry in strains the machine. It can lead to leaks and affects how clean your clothes get.
Spread out your clothes inside, especially heavy items. Use bags for things with zippers or hooks. These can rip the seal. Don’t use high heat too often. It can age the rubber faster.
If you’re fixing something big, think about changing out the seal too. If you’re already working on the machine, it’s a good time. It saves money compared to doing it later.
| Task | Frequency | Benefit |
|---|---|---|
| Gasket cleaning with vinegar | Monthly | Reduces mold and detergent buildup, aiding washing machine rubber seal leak prevention |
| Maintenance hot cycle | Monthly | Removes residues that shorten seal life, part of washing machine seal maintenance |
| Hose inspection and replacement | Inspect quarterly, replace every 5 years | Prevents supply/drain failures that can stress seals |
| Level and balance check | Every 6 months or after relocation | Reduces drum wobble and pressure on the mechanical seal |
| Proper detergent use | Every load | Limits excess suds that cause preventing washing machine seal leak |
| Load distribution and garment bags | Every load | Prevents punctures and unbalanced loads that speed seal wear |
The cost to fix a leaking seal depends on parts and labor. Mechanical seal kits range from $20 to $120. Brands like LG and Samsung might be more expensive.
Technician labor costs vary in the U.S. They charge about $75 to $150 per hour. Fixing mechanical seals typically takes 1.5 to 3.5 hours. There might also be extra fees for service calls and travel.
A simple job can cost between $150 and $400. But if more parts need changing, the price can jump to $400–$800. Think about extra costs and diagnostic fees when planning.
Average price washing machine seal repair figures help you know what to expect. Ask for detailed estimates that list everything. Make sure you know if the parts are OEM or not.
It’s easier to plan repairs with a checklist. First, see if your washer is still under warranty. Warranties might cover some costs. Next, add 20–30% more to your budget for unexpected issues.
If repair costs are close to the price of a new washer, consider replacing it. You might save by buying OEM parts yourself. Always get multiple quotes and check part warranties.
Avoid surprises by asking for detailed bills, checking average repair costs, and comparing them to buying new. This helps you make smart choices and stick to your budget.
A washing machine seal leak might start small but can cause big problems if overlooked. Early detection stops water damage and saves money, whether it’s a torn gasket, shaft seal failure, or hose issue. If your machine makes grinding noises or wobbles, it could mean the bearings are wearing out too.
To spot a door seal leak, a good inspection is key. Fixing seal issues can vary, from simple cleaning to replacing the gasket or the entire seal and bearings. The work needed changes with each brand and model, and front-load machines often require more effort. Using the correct detergent, keeping seals clean, making sure loads are balanced, and checking hoses regularly can make seals last longer and prevent leaks.
If you like DIY projects, you might be able to fix seal leaks or replace gaskets yourself. Look for guides specific to your model and buy the right parts. For mechanical seal and bearing repairs, you’ll need the right tools, to watch helpful videos, and to set aside plenty of time. If you run into motor or bearing problems, it’s smart to call a pro, especially if it’s still under warranty. Keep all your receipts, note part numbers, and document repairs to make any future replacements easier.