Our Location
1250 Beacon Street
Brookline, MA 02446
Learn kitchen appliance troubleshooting tips to fix refrigerators, ovens, dishwashers, and more. Save money with easy DIY repairs at home.
Did you know that American homeowners spend an average of $247 on a single professional appliance repair visit? This staggering statistic reveals why kitchen appliance troubleshooting has become an essential skill for budget-conscious homeowners.
Modern innovative kitchen appliances and smart cooking devices offer incredible convenience. But when they malfunction, repair costs can quickly escalate. Learning basic DIY repair techniques can save you hundreds of dollars annually while extending the life of your kitchen equipment.
Understanding kitchen appliance troubleshooting doesn’t require advanced technical expertise. Many common issues can be resolved with simple tools, careful observation, and a willingness to learn. This guide will empower you to diagnose and fix problems with refrigerators, microwaves, dishwashers, and other essential kitchen devices.
Whether you’re dealing with a temperamental coffee maker or a refrigerator that’s not cooling properly, these strategies will help you tackle repairs confidently and safely. By mastering these skills, you’ll become a more resourceful homeowner and protect your valuable kitchen investments.
Kitchen appliance troubleshooting can seem intimidating, but with the right knowledge and tools, homeowners can tackle many repair challenges confidently. Mastering the basics of diagnosing and fixing kitchen gadgets not only saves money but also empowers you to maintain your top-rated cooking tools effectively.
Before diving into any repair, understanding the fundamental approach to kitchen appliance troubleshooting is crucial. This involves systematic problem identification, careful diagnosis, and strategic repair techniques.
Safety must always be your primary concern when working with kitchen appliances. Follow these critical guidelines to protect yourself:
Building a comprehensive repair toolkit is essential for effective kitchen appliance troubleshooting. Here are the must-have tools for DIY repairs:
| Tool | Purpose | Recommended Type |
|---|---|---|
| Multimeter | Electrical connection testing | Digital precision model |
| Screwdriver Set | Disassembly and reassembly | Phillips and flathead varieties |
| Adjustable Wrench | Tightening and loosening connections | 8-inch ergonomic design |
| Needle-nose Pliers | Handling small components | Insulated grip model |
Investing in quality tools transforms your kitchen appliance troubleshooting from guesswork to a precise, methodical process. Remember, the right tools can make the difference between a successful repair and a costly mistake.
Refrigerator problems can be frustrating, but many issues can be resolved through kitchen appliance troubleshooting without professional help. Understanding the basics of sustainable kitchen appliances maintenance can save you money and extend your refrigerator’s lifespan.
Start by checking the most common refrigerator problems:
Clean condenser coils are crucial for efficient refrigerator operation. Dust and pet hair can reduce cooling efficiency by up to 25%. Use a vacuum or specialized coil brush to remove debris from the back or bottom of your refrigerator.
| Problem | Potential Cause | DIY Solution |
|---|---|---|
| Not Cooling | Dirty Condenser Coils | Clean coils thoroughly |
| Water Leaking | Blocked Defrost Drain | Clear drain with warm water |
| Frost Buildup | Faulty Door Gasket | Replace door seal |
Temperature management is key for sustainable kitchen appliances. Keep your refrigerator between 37-40°F and freezer at 0°F. Proper organization allows better air circulation, improving overall efficiency.
Pro Tip: Regular maintenance prevents costly repairs and extends your refrigerator’s life.
When strange noises persist or cooling completely stops, it might be time to consult a professional. Kitchen appliance troubleshooting has limits, and some complex issues require expert intervention.
Microwaves are essential healthy cooking appliances in modern kitchens, making kitchen appliance troubleshooting skills crucial for homeowners. Understanding common microwave issues can save time and money on unnecessary repairs.
Before diving into specific problems, remember that safety comes first. Always unplug the microwave before attempting any repairs and avoid opening internal components.
Microwave power issues can stem from several sources. Check these key areas during kitchen appliance troubleshooting:
When your microwave runs but doesn’t heat food properly, potential causes include:
Mechanical problems can disrupt your healthy cooking appliances’ performance. Common door and turntable issues include:
Pro tip: Clean the turntable roller guide and motor regularly to prevent rotation problems. Lubricate moving parts with food-safe silicone spray for smooth operation.
If complex issues persist, consulting a professional technician is recommended to ensure safe and effective repairs.
Kitchen appliance troubleshooting often involves tackling common dishwasher issues that can frustrate homeowners. Water pooling at the bottom of your dishwasher or dishes emerging dirty are signals that something needs attention.
Start by investigating these key areas during your kitchen appliance troubleshooting process:
For eco-friendly cookware owners, special care is crucial. Residue from certain materials can impact dishwasher performance. Clean spray arm holes using a toothpick or small wire to remove mineral deposits blocking water flow.
| Problem | Potential Solution |
|---|---|
| Dishes remain dirty | Clean spray arms, use rinse aid |
| Water not draining | Check drain hose, clean filter |
| White film on dishes | Use water softener, descaling agent |
Pro tip: Run an empty cycle with a dishwasher cleaner monthly to prevent mineral buildup and maintain optimal performance.
Kitchen appliance troubleshooting becomes critical when your gourmet cooking equipment starts malfunctioning. Ovens and stoves are the heart of any kitchen, and understanding how to diagnose and repair common issues can save you time and money.
Modern ranges come in electric and gas models, each with unique repair challenges. Knowing the right techniques can help you restore your cooking performance quickly.
Uneven heating can ruin even the most carefully prepared meals. Here are key diagnostic steps for kitchen appliance troubleshooting:
Electric ovens often develop heating element problems. Look for signs like blistering or visible breaks in the element. Replacing a faulty heating element is typically a straightforward DIY repair for gourmet cooking equipment.
Stove burners require different troubleshooting approaches for electric and gas models:
Safety warning: Always disconnect power before performing repairs. For gas appliances, call a professional if you suspect serious gas line issues.
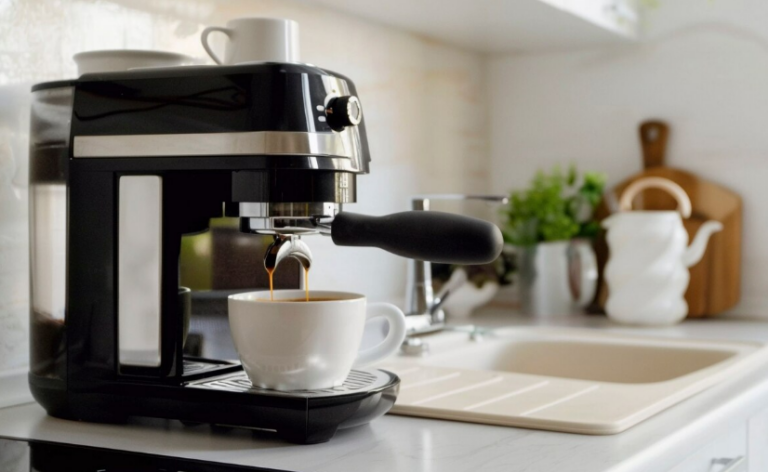
Kitchen appliance troubleshooting for small kitchen appliances can save you money and extend the life of your favorite devices. Many common problems with coffee makers and other compact kitchen tools can be fixed with simple DIY techniques.
Coffee makers often develop issues that seem complex but are relatively easy to resolve. Here are some typical problems and their solutions:
Descaling is crucial for maintaining your coffee maker’s performance. Use white vinegar or a commercial descaling solution every 3-4 months to remove mineral deposits that affect taste and brewing speed.
Other small kitchen appliances like toasters, blenders, and food processors also benefit from regular maintenance:
When facing persistent issues, consider the cost-effectiveness of repair versus replacement. Sometimes, purchasing a new small appliance is more economical than investing in extensive repairs.
Pro tip: Regular cleaning and basic maintenance can prevent most small kitchen appliance problems before they become serious.
Preventive appliance maintenance is the secret weapon for homeowners looking to maximize their kitchen investments. Regular care can dramatically extend the life of your appliances, saving money and reducing unnecessary waste.
Smart kitchen appliance troubleshooting begins with understanding the importance of routine maintenance. Experts suggest that proper care can extend an appliance’s lifespan by up to 50% and improve overall performance.
Developing a consistent maintenance routine involves several key strategies:
“An ounce of prevention is worth a pound of cure” – especially when it comes to kitchen appliances.
Kitchen appliance troubleshooting requires keen observation. Watch for these potential red flags:
Preventive appliance maintenance isn’t just about cleaning. It’s about developing a proactive approach to keeping your kitchen running smoothly. By catching small issues early, you can prevent costly repairs and extend the life of your valuable kitchen equipment.
Pro tip: Keep a maintenance log for each appliance to track cleaning and potential issues.
Kitchen appliance troubleshooting can be tricky. Not every repair is suitable for a DIY approach. Some situations demand professional appliance repair expertise to ensure safety and prevent costly mistakes.
Certain repairs should always be left to professionals:
Warranty considerations are crucial. DIY repairs often void manufacturer warranties, making professional service the smarter choice for newer appliances.
“When in doubt, call a professional. Your safety and appliance’s functionality are worth the investment.”
Use the “50% rule” when deciding between repair and replacement. If repair costs exceed 50% of the appliance’s replacement cost and it has reached half its expected lifespan, replacement might be more economical.
When seeking professional appliance repair, consider these tips:
Trust your instincts. If a repair feels beyond your skill level, professional help is the safest choice.
Kitchen appliance troubleshooting doesn’t have to be intimidating. With the right knowledge and approach, homeowners can tackle many DIY appliance repair challenges confidently. The skills you’ve learned can save significant money and extend the life of your kitchen equipment.
Remember that successful DIY repair starts with understanding basic diagnostic techniques and prioritizing safety. Each appliance presents unique challenges, but most minor issues can be resolved with patience, proper tools, and a systematic approach. Online tutorials, manufacturer manuals, and homeowner forums offer excellent additional support for those looking to expand their repair skills.
While not every problem can or should be fixed independently, developing kitchen appliance troubleshooting skills empowers homeowners to handle routine maintenance and simple repairs. Start small, build your confidence gradually, and always know when to seek professional assistance. The goal is not to replace technicians but to become a more knowledgeable and self-sufficient homeowner.
Your newfound DIY appliance repair expertise will not only save money but also reduce waste by keeping kitchen appliances functioning efficiently. Take pride in learning these practical skills that can serve you throughout your home ownership journey.
No, not all repairs are safe for DIY. Homeowners should avoid repairs involving gas lines, high-voltage electrical components, refrigerant handling, or complex electrical systems. Always prioritize safety and consult a professional for potentially dangerous repairs that could risk personal injury or further damage to the appliance.
Regular maintenance varies by appliance. Refrigerator coils should be cleaned every six months, dishwasher filters monthly, and oven interiors quarterly. Creating a consistent maintenance schedule can extend appliance lifespan by 40-50% and improve overall energy efficiency.
Essential tools include a multimeter for electrical testing, Phillips and flathead screwdrivers, adjustable wrenches, needle-nose pliers, a flashlight, and appliance-specific tools. These top-rated cooking tools will help you diagnose and resolve many common kitchen appliance issues safely and effectively.
Use the 50% rule: If repair costs exceed 50% of a new appliance’s price and the current appliance has reached 50% of its expected lifespan, replacement is usually more cost-effective. Consider factors like energy efficiency of newer sustainable kitchen appliances and potential long-term savings.
Implement preventive maintenance by regularly cleaning appliances, checking seals and connections, avoiding overloading, and addressing minor issues promptly. Use manufacturer-recommended cleaning methods and pay attention to warning signs like unusual noises, performance changes, or increased energy consumption.
Many DIY-friendly repairs include cleaning refrigerator coils, replacing microwave door seals, descaling coffee makers, unclogging dishwasher filters, and checking oven heating elements. These innovative kitchen appliances often have user-friendly diagnostic features that make troubleshooting accessible to homeowners.
Always check your warranty documentation carefully. DIY repairs can often void manufacturer warranties, especially for newer appliances. For smart cooking devices and high-end kitchen equipment, it’s best to consult the manufacturer or an authorized repair center before attempting any repairs.
Always unplug the appliance, turn off circuit breakers, wear protective gloves, avoid water near electrical components, and work in a well-lit area. Use proper tools, follow manufacturer guidelines, and stop immediately if you feel uncertain about any repair process. Safety should always be your primary concern.